I love eggs, and I love Starbucks. Over the weekend I was checking out recipes and I stumbled across a couple of recipes for "Starbucks Sous Vide Eggs" which I had never heard of before. I have been trying to make my own coffee every morning to avoid paying for coffee. So far it has worked, I have only been to Starbucks maybe 2 times in December. Yah for my pocketbook! Boo for my knowledge of new Starbucks menu items.
When you head over to the Starbucks website, the first thing on their site is about their "Sous Vide Eggs" which essentially are like an egg souffle made in a Sous Vide machine. Sous Vide is a method of cooking the food in a water bath. Food is in a vacuum sealed bag. It's fancy schmancy and you need a special machine. I decided to give these a try in my instant pot as many of the recipes had recommended.
Ingredients:
4 Eggs
1 Cup Cheese (I used cheddar/mozza mix)
1/2 Cup Cottage Cheese
1/3 Cup Heavy Cream
1 tsp Salt
1 tsp Pepper
Other Spices (I only used S&P for this round)
4 Slices Pre-Cooked Bacon
Cooking Spray
I thought I would have enough small mason jars to use but I didn't. The mason jars that didn't have food in them were the 500ml size which has a fluted top which would not allow for the eggs to come out easily. I found a large silicone muffin tin which I don't really ever use. I decided that I would cut this pan up to fit into the instant pot.
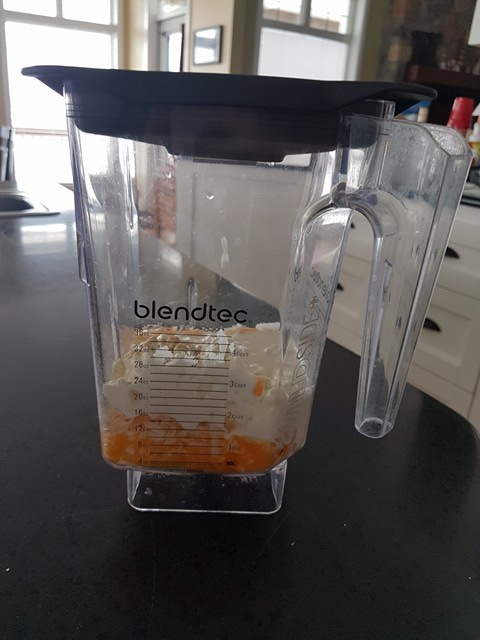
Mixing the Souffle - Add all ingredients except the bacon into a blender. Mix on high for 25 seconds. Volume should double.
Preparing the Instant Pot - Add 1 cup of water to the bottom of the instant pot. Add in the wire baking rack that comes with the unit.
Preparing the Muffin Tin - Spray each muffin cup with non-stick spray. Add a 1/4 of the bacon to each cup. Set the muffin tin inside of the instant pot on top of the wire rack. Gently pour the egg mixture into the muffin cups. This is a bit tricky to do while the tin is inside of the unit, but because of the flexibility of the silicone, it was impossible to pour it in the cups and then getting it into the unit.
Setting the Instant Pot - After checking all of the seals and gauges, put the lid on and turn the pressure gauge to closed. Use the steam function and set for 7 minutes. When it is done, let it come down in pressure naturally for 8 minutes. Mine came down naturally in 6 minutes so I just left it in the pot for another 2 minutes.
Removing the Egg Souflees - I had to use tongs to grab the silicone muffin tin and pulled it out of the pot. The eggs looked like little eggy muffins. They were kind of silky like on the top. I gently removed an egg from the tin. It was soft but held it's shape.
I decided to throw a little bit of Dave's Hot Sauce on the plate with my egg souffle. The souffle was quite tasty. It was like a really soft omelette. It was a bit silky, and soft and had a mild cheese flavor. The bacon was a nice addition.
Overall I would give this recipe a 4 star. It was pretty labor intensive for the four little souffle but it is delicious. Would I pay $5 for one of these at Starbucks? Probably not. These would be a good option for a fast food low carb or Keto diet option though.
A couple of months ago I was coming back from Vernon after a visit with my relatives. I was starving by the time I got to Kamloops, so on the way through town, I stopped into Arby's. I'm not the biggest fan of Arby's but it was on the way and quick and something different. When I pulled up to the drive-thru they had a sign for a limited time special, the Pork Belly sandwich. I had pork belly before at a Korean BBQ place and I was thoroughly underwhelmed. It was like thinly sliced pork tenderloin. It was a far cry from what pork belly looked like on the food network. I always thought pork belly was almost like a thick bacon cooked until it was tender and then sliced. The picture of the Pork Belly sandwich looked like the pork belly I had longed to try. I decided to try one. It was the most delicious fast food sandwich I had ever tried.
The sandwich had chunks of Pork Belly in a tangy BBQ sauce, with a battered onion frizzles on the top, a smoked cheddar cheese, and a bit of mayo on the bottom. The pork belly was like giant soft bacon, without the saltiness of bacon. The whole sandwich was a perfect consistency. It was so soft, and the onions gave it a little bit of crunch. The BBQ sauce was tangy yet sweet, and the mayo gave it a bit of creaminess. I am pretty sure I ate this thing in maybe 4 bites. My mouth watered the entire 1 hour drive to my house.
The Happy Man Snacks review of the Arby's Pork Belly Sandwich was literally exactly what my reaction was to this sandwich. Check out their youtube channel here: Happy Man Snack Review
Sadly, a month or so later I went to get another one and it was gone. It was only available for a limited time and to my disappointment I missed the boat on getting another one. Since I had driven to Arby's for lunch, I figured I would just get something else. I decided to get a buffalo chicken sandwich. It was terrible! I was probably pre-judging the buffalo chicken because it was not what I was expecting. It was sloppy, way too spicy for me, had far too much sauce on it. I ate it only because I paid for it and needed to eat something before heading back to work.
I was at a local butcher last week picking up something and asked if they ever got pork belly. They were able to pre-order me some, which came in this week. I picked it up after work yesterday, along with some buns. I was determined that I was going to make a Pork Belly sandwich of my own.
I ran into a couple of issues right away. First being, I have no idea how to cook Pork Belly. I researched most of Friday night on methods of cooking. Some recommended slow cooking, fast cooking, two-part cooking where you cook then cool in the fridge then cook again. Since I just got an instant pot last week, I was really looking for a way to cook it in the new gadget. The second issue, I really had no idea how to score the skin of the belly. After looking at what seemed like a thousand recipes, I settled on one for one that used the instant pot. I modified the recipe, as always, because I didn't have all of the needed ingredients. This is an all day kind of recipe and you will most likely use a million dishes but it's totally worth it.
Preparing the Pork Belly - Get the pork belly out of the fridge and cut it into smaller chunks because it was massive. I cut a chunk about 12 inches by 6 inches. The next step was to score the skin on top of the slab of porky goodness. I grabbed my sharpest knife and scored through the skin in a crisscross manner. This was actually pretty hard to get through even though I sharpened my knife prior to trying. I cut down about 2mm into the skin.
Marinating the Pork Belly - Add all ingredients for the marinade into a ziplock bag with the scored Pork Belly. Get as much air as you can out of the bag. Stick in the refrigerator for an hour.
Preparing the Stock - Pour all ingredients for stock into a microwavable bowl and heat for 3 minutes on high. Let sit until you are ready to add to pot.
Searing the Pork Belly - Turn on the Sear function on the instant pot, which essentially is like a really quick heating frying pan. Sear both sides of the belly for 3 minutes. I would highly recommend throwing a pot lid over the instant pot while you are searing the skin side as it pops and sprays and makes a big mess. Luckily my biggest lid in my pot set fits perfectly on top of the instant pot inner "pot." That is a lot of the word pot in one sentence! I may have left the skin side of my belly in a bit too long, the honey carmelized to the bottom of the pan and created a bit of char.
Cooking the Pork Belly - Once seared, pull the piece of meat out of the instant pot, stick the cooking rack in, sit the belly on the cooking rack with the skin side up. Pour the stock into the pot, avoiding getting any on the top of the belly. It would probably be easier to just pour the liquid in first then put the belly on the rack. Check all seals and gauges on the instant pot lid, then close the lid and turn the pressure gauge to closed. Set the unit for stew/soup for 18 minutes. Because the unit was hot from the searing and the stock was warm, pressure built in my unit in less than 5 minutes. Once the 18 minutes is up, manually de-pressurize the unit by using tongs to turn the pressure gauge to release. It only took about 2 minutes to come down in pressure.
Cooking and Pressing - The next step is to cool and press the pork belly with something heavy for a couple of hours. I used two glass pans with parchment paper under and on top of the belly, and then put a couple of heavy cans of tomatoes to weight it down. I really need to get a kitchen weigh. I have been talking about it for years, like every time I make grilled cheese. Apparently, they are called "Gill Press" according to Amazon. I may have to purchase this super cute Norpro one that has a piggy on the top, and has great reviews. I stuck it in the fridge and waited about 2 hours for it to cool down.
Prepping the Onions for Frizzles - Slice the onions as thin as humanly possible. I used my mandolin. Add onions and buttermilk to a bowl and let sit in the fridge for an hour.
Slicing the Cooled Pork Belly - Dig the pork belly out of the weighted contraption and slice it with a sharp knife, with the grain. Slices should be about 1/4 of an inch thick. It should look like thick slices of pork with layers of fat in between.
Saucing the Pork Belly - Use your favorite BBQ sauce to coat the pork belly slices and fry in a pan on low until the pork is hot.
Coating and Frying the Frizzles - Mix the flour and salt & pepper in a bowl. Take the onions out of the milk bath and put a handful at a time into the flour coating. Using a deep fryer or in a pan, fry the frizzles until golden brown.
Assembling the Sandwich - Split buns in half and toast the cut side so it is a bit crunchy. Add may to the bottom half. Add a slice of cheese to the top half. Add 2 slices of pork belly to the bottom half, then cover in frizzles. Stick the top bun with the cheese in the microwave for about 25 seconds to melt the cheese a bit. Add the top half to the bottom.
What to pair with this sandwich? This sandwich is rich and needs to be accompanied by something like a side salad. Coleslaw or broccoli salad would also be good choices.
You will most definitely need some napkins when eating this beauty!
Oh my god, this sandwich may be better than the Arby's version! My pork belly wasn't quite as soft as theirs but I will perfect it. This sandwich is like BBQ angels put heaven into a bun. This may be the best thing I have made in a long long time. My mouth is still watering after finishing it off about 20 minutes ago.
Pork Belly may be my new favorite cut of meat!
I hope you enjoyed and you try this out if you have a whole day to kill.
I heard about the infamous "Instapot" about 6 months ago and to be honest, sort of brushed it off as the next "fad" kitchen gadget. I was determined I wasn't going to get one because lord know's I do not need another kitchen appliance. I have two slow cookers and a pressure canner which converts to a pressure cooker. I also have a yogurt maker which I must admit kind of is terrible, it's about 50 years old and the jar lids have all broken.
Over the Christmas season, I am pretty sure 25% of my friends received an "Instapot" for a present. My mom even bought one. Seeing people I know in real life talk about the quick meals they have been making peaked my interest. After much research, I decided that I needed the Instapot that had the largest size and the most functions (of course I did...). My problem was that it was $220 plus tax, which would throw it into the $250 range with the wonderful 12% tax rate in beautiful British Columbia (aka Bring Cash).
I looked at some of the other brands that were out there. One that peaked my interest was one called the GeekChef. I was initially drawn to this one because it had a Canning function and a Sous Vide function. I do a lot of canning in the summer months and a pressure canner is a necessity for canning anything outside of jams, acidic fruits, and tomato based stuff. Anything that is lower in acid needs to be pressure canned to kill the spores which could cause botulism. I invested in a Presto 23 quart Pressure Canner last year. It's easy to use once you get used to the concept, but it takes FOREVER to come up to pressure. I have tried cooking in it as it converts to a pressure cooker. The meal I made in the pressure canner turned out good, but it took awhile to come up to pressure, and then back down in pressure. It isn't recommended to speed the de-pressurization of a canner/cooker. The pressure up and down adds at minimum an hour to the process. The Sous Vide function also peaked my interest because well, I never heard of it before, and it looked cool. It's basically cooking the food placed in a sealed plastic pouch until it hits a perfect temperature. It looks amazing, but the reviews on the Sous Vide function of this one weren't the greatest. They are also pricier than some of the other options. I decided if I could find one in Kamloops at a decent price I would consider this brand. I had zero luck finding one of these GeekChefs in Kamloops.
We were heading into town to do some shopping on Saturday. I decided I would look around at the stores we were in to see if they had any options available. I was in Costco, our last stop, and I walked by the small appliance aisle. I noticed a box that looked like an "Instapot" so I headed down that aisle. To my chagrin, it was an Electric Pressure Cooker! It was one of the brands that I had looked at on Amazon. It was called a Power Pressure Cooker XL. It was an 8 Quart, which was bigger than most, it had a canning feature, had a bunch of pre-set functions, and the best part, it was only $119. This is very similar to the Instapot version I was looking at that was $220. The only thing it is missing is a yogurt function and some of the pre-sets. I am sure you can still make yogurt in it, just no pre-set button. It felt like Christmas! You can also get this version on Amazon but it is about $50 more expensive.
Last night I read through the manuals on the operation. It sounded kind of tricky to operate but once I took it out of the box this morning and actually did the testing that was required before first use, it actually wasn't that hard at all. Basically, you need to make sure all of the pressure sensors and seals are clean and working properly. You add your ingredients, close the lid, turn the pressure gauge to closed, and press the buttons for your recipe. It took about 15 minutes to come to pressure, which seemed long, but I had cold water in the pot. Once the pressure was up to where it needed to be, the pot made some hissing noises and the red pressure button popped up. This scared the life out of me, but the same thing happens with my pressure canner, so I assumed that this was a normal feature. Once pressure is reached, the timer starts counting down, which was 10 minutes. Once the 10 minutes were over, the machine beeped.
The next step in the test phase was to de-pressurize the unit. With the pressure canner, you always let it naturally come down in pressure, which takes forever. The instructions for the Power Pressure Cooker de-pressurization was to get a pair of tongs and manually open the pressure valve. I thought that would be super easy, but it was definitely not as easy as it sounded, and it took me a couple of tries. This is not something you would want to do without some tongs and definitely not with your bare hands. When you move the pressure gauge to open, it spurts and starts letting out a gush of steam. My husband came out of the bedroom to see what all of the commotion was about. It dropped in pressure enough to lower the red safety button in about 3 minutes. That was super fast considering it takes about 30 minutes for my pressure canner to come down in pressure. Testing was a success.
I decided later in the day to try cooking my arch nemesis, hard-boiled eggs. I can cook and bake some pretty impressive stuff, but hard boiled eggs are not one of them. I love to eat them, hate the whole process of cooking them and peeling them. I always end up getting shell everywhere, cracking off half the egg in the process. The last time I made them they looked like mangled white rocks. My mother had done some eggs in her unit as a test, so I thought I would give it a try. The recipe said to use the rice cooking feature of the unit and to add about 1.5 cups of water. I placed 8 eggs on the little tray thingy that came with the unit, added the water (hot this time to see if it would help speed the pressurization), closed the lid, turned the pressure gauge to lock, and pressed the rice button. It took about 10 minutes this time to come to pressure, and then 6 minutes to cook. The recipe I had said to let the unit come down in pressure naturally, which took about 5 minutes. It then said to put the eggs in an ice bath once out of the cooker.
After about 5 minutes in the ice bath, I decided to take them out and start the process that I despise, cracking and peeling the eggs. I took one of the eggs and tapped it on the counter to crack the shell a bit. I got under the membrane and the shell peeled off pretty easily. Even the one egg that had a crack in it when it came out of the cooker peeled very well with no damage.
I rinsed the eggs off, because I hate tiny bits of eggshell, and then sliced one open. The inside of the egg was a little discolored which leaves me thinking that they were overcooked. The next time I make these I would either lessen the cooking time by a couple of minutes and still let them de-pressurize naturally, or I would leave the cooking time at 6 minutes and then de-pressurize manually so they aren't sitting in a hot water bath for longer than needed.
I added the eggs to a container and poured a salt brine over them (water with 1 tsp of salt). This will keep them fresher longer. Overall the egg experience in the cooker was much more successful than my normal egg cooking experiences. A couple of changes the next time and I think that these will be perfect.
It is a seemingly right of passage for teenagers and kids to do stupid things. When I was younger, kids were playing the choking game where you would choke yourself until you passed out. Kids on the East Coast sometimes would go "ice clamper hoppin" which is as dangerous as it sounds.
You may be asking what the heck "ice clamper" means. According to the Urban Dictionary, an Ice Clamper is a Cape Breton slang term for an iceberg. That literally is the only thing that came up when I Google'd "ice clamper." An "ice clamper" is kind of similar to an iceberg, but not the same thing. In the Sydney Harbour, large chunks of broken up ice from the ocean will float into the harbour, and then back out of the harbour, a couple of times before spring. They are more like thick slabs of sea-ice. Most are flat on the top. They aren't really like an iceberg at all. There is an old wives tale that after the second coming of the clampers, Spring is right around the corner.
Basically, when the "ice clampers" come into the harbour, some locals (mostly teenagers) will jump from clamper to clamper, hence the "ice clamper hoppin". They are literally jumping from one chunk of ice to the other, with the cold, dark Atlantic ocean underneath. Slip off a "clamper" and you are in the icy cold water. It's super dangerous and there have been lots of people hurt over the years doing this. KIDS and ADULTS don't jump on ice clampers!! I feel like I may need to make that last sentence neon and flashing. It's an awful pastime, don't do it.
The last couple of weeks I started to hear about kids and young adults who have been partaking in the stupidest "challenge" I have ever heard, biting into laundry pods. At first, I didn't believe that it was possibly true. Why would anyone in their right mind want to put any type of soap into your mouth? I almost die when I get a bit of dish soap in my mouth accidentally. Wasn't washing your mouth out with soap a form of punishment in the past? I am positive that child services would be called if a kid's parents tried to wash their mouth out with soap nowadays, but now they are doing it themselves.
I would like to know who came up with this challenge. Who out there thought, "Hey I bet it would be fun to bite into a laundry pod that is filled with soap, bleach, softening liquid." Then who decided it would be fun to video people taking the challenge. People obviously don't have enough brain cells to understand the gravity of taking part in this challenge. Do parents not warn their kids about poisonous substances? PSA: everyone needs to watch this old school Canadian video with your kids.
I used to have a couple of healthy eating book that I loved called "Eat This, Not That" which had suggestions on foods not to eat, and ones to substitute them with to eat healthier. Watching a video about the "tide pod challenge" by the Prince Edward Island police officer, I got thinking about the "Eat This, Not That" books. I kind of feel that we need an "Eat This, Not That...Definitely Not That" to give to kids in elementary school. A couple of pages that come to mind...
It saddens me that as a society as advanced as we have become, that we actually have to have these conversations. Kids can figure out how to use an ipad at less than a year old, yet we have to tell them not to eat chemical filled laundry pods.
Please please please talk to your kids about eating laundry pods, and the dangers of these "online challenges."
I am not going to lie, it's been a long, long time since I have read a book for pleasure. I read stuff at work all day, and then read through a lot of Internet stuff after work, and then some evenings I am reading through resumes. I think you get where I am going, reading for pleasure after reading all day every day isn't the top priority.
In November, I downloaded a Kindle Version of "Where I Belong" by Alan Doyle, one of my favorite Canadian singers, and the former lead singer of Great Big Sea, one of my favorite bands of all time. I thought it would be prudent to read this book because Alan Doyle was going to be the artist on the CP Holiday Train this year.
The CP Holiday train rolls through our little town every year. Typically my husband, who is a huge train fan, is working during the event. This year he was going to be home! We decided that we had to attend and that we would go to the event in Savona, BC and then jump in the car and drive to Ashcroft, about 30 minutes away.
The Savona show was amazing! Alan Doyle and the Beautiful Band started with a Christmas Tune, and then threw in a couple of Great Big Sea songs! I am pretty sure I was the only one in the crowd that knew the Great Big Sea songs. When the show was over, we jumped in the car and drove the 30 minutes to Ashcroft. We thought we would have tons of time to stop and grab a coffee, but we just made it at the same time as the train.
The Ashcroft show started out with one of the most beautiful renditions of Oh Holy Night by Corey Tettford. It was magical. The setlist for the Ashcroft show was much longer and different than the Savona show. One of my favorite East Coast Christmas Carols, "I'll Be There Christmas Eve" was on the setlist. I an 100% sure that not one other person knew this song. It brought me back to listening to this song at my grandparents during the Christmas season. The set had some amazing Great Big Sea tunes, a couple of traditional tunes and a couple of mainstream carols.
After seeing Mr. Doyle twice in one night, and to get to share the CP Holiday Train with my husband, and experiencing the magic of the train, I knew this was one of the highlights of my year! The next day I started down a deep spiral of Great Big Sea videos on YouTube! I also started finally broke into the book. I very quickly remembered why I didn't read for pleasure a lot, I just don't have time. I also remembered how much I like getting lost in a book.
"Where I Belong" starts out with a Boy standing on a bridge, contemplating his life in small-town Newfoundland. This book takes you through the early life of this boy, his strong family ties, his musical roots, his passion for hockey, and his antics around the fishing docks.
This book brought me back to growing up in a small house in a tiny community. Being brought up on homemade bread and gravy, and the love of his family, this boy would become a musical prodigy in his hometown and across the country.
Alan's stories of the antics of his buddies working on the dock cutting cod tounges were hilarious. I can vividly imagine him getting thrown into the water playing ball hockey. His longing to meet the girls from the Protestant side of the bridge, as all of the girls on the Catholic side were his cousins made me chuckle. This is a common plight of youngsters in small towns on the East Coast. I typically avoided any boys in my town because there was a pretty decent chance they were related to us somehow.
This story is written in a way that captures the audience and makes you want to come back for more. As an East Coaster displaced on the West Coast, it filled my hear with joy to read. I couldn't get enough of the book and knew I had to get Alan's next book so I could read it over the Chrismas season.
You need to get yourself a copy of this book!
5 Stars!
PS there is an affiliate link below if you want to purchase a copy on Amazon.
Jen Learned How to Make Seafood Chowder “aka West Coasters think this is the best chowder ever”
I was looking for a family recipe for Seafood Chowder. My family members make killer chowder. One side makes a thicker chowder that sticks to your ribs. One small bowl and you are stuffed. The other side makes a thinner chowder which is equally delicious. I decided I wanted to try something in between. After being schooled by my uncle on how he generally makes his (he has no recipe), reading my aunt's recipe for the thicker chowder, and doing a bit of research on the “Cape Breton Cook Book” Facebook group, I thought I had a good grasp on how to make a chowder.
I made a test batch with some less expensive seafood, tested it out on my ever-willing Husband and the Quality Control tester (the fluffy black Lab), and it was a hit. I was having some neighbours over for a get together a couple of days later, when I would make the chowder again, only with what I would consider traditional seafood chowder ingredients, lobster, scallops, clams and shrimp. Shrimp is probably the least traditional, but we like shrimp. I couldn’t find any good mussels otherwise I would have added those as well.
Servings: 24
Cook Time: 1 hr
Ingredients: 5 Cooked Lobster (tails and claw meat cut into bite size pieces) 1 Large Bag of Shrimp (cooked, peeled, tail off) 30-40 Scallops (cut into bite size pieces) 2 cans of Baby Oysters 8 Cups Water 10 Large Carrots 4 Stalks of Celery 1 Large Onion 10 Medium Potatoes 1 cup Water 2 TBSP Old Bay Seasoning 2 tsp Salt 2 tsp Pepper 1.5 L Coffee Cream (10%) 1.5 cup plus ¼ cup Butter (use real salted butter…don’t substitute margarine) 1 cup dried potato flakes buttery flavored (don’t get a flavored one)…(ps this is the secret ingredient)
Fry the Lobster: Add cooked lobster and ¼ cup butter into hot pan. Fry lobster in the butter for about 5 minutes. Butter will turn a bit red, and lobster will turn an orange color. Taste test lobster, but don’t eat it all! Put aside.
Veggies: Peel carrots Dice carrots and onions into small pieces Slice celery thinly Add carrots, onions, celery and 1.5 cups of butter to a large stock pot This will be the pot you will make the chowder in so make sure it’s large enough (like this one) Turn burner to between high and medium Carefully cook the carrots, onions and celery until they are soft (about 20 minutes) Make sure you stir often so they don’t burn to the bottom
Potatoes: Peel potatoes Cut into bite size pieces Put in microwave proof bowl with 1 cup water Cover with saran wrap Cook in microwave on high for 15 minutes or until potatoes are soft Put aside
Seafood Stock: Boil 8 cups water in a separate pot Add scallops, shrimp and drained oysters Add 1 TBSP of Old Bay Seasoning Boil for 20 minutes
Putting it all together:
Once the veggies have become soft you are ready to start assembling the chowder You will need a million spoons to taste test
Turn the burner to medium Carefully remove the seafood from the stock and add to the large pot with the veggies Add the fried lobster Add the cooked potatoes (with cooking liquid, which will aid in thickening) Carefully add the stock from the seafood to the pot (the stock should bring the liquid about up to the top of the other ingredients). Add 1 TBSP of Old Bay seasoning Add Salt & Pepper Let this come to a boil, stirring often to ensure it doesn’t burn to bottom Let boil for about 10 minutes Taste test the broth. It should be flavorful, not overly salty or peppery. Add more salt, pepper or old bay to taste. This is where I use some of the million spoons.
About 5 minutes before you are ready to serve, add coffee cream to a microwave safe bowl. Microwave on high for 2-3 minutes until lukewarm (this is a super important step, if you add the cream in cold it will separate).
Add the warmed coffee cream to the stock Taste again, add more spices if needed Add 1 cup of flaked potatoes to thicken the broth
Enjoy with some home-made bread, rolls or biscuits Eat within a couple of days Delicious the next day!
I must admit, 2017 wasn't my year, as I am sure it wasn't a lot of people's favorite year. It was full of ups and downs, happiness and sadness, and just plain craziness.
For me it started out with a major surgery to fix an issue that almost killed me the summer prior. This surgery was badly needed and forced me to slow down for the two month recovery.
Less than a month after, the best part of 2017 happened. Our first nephew was born! He is the sweetest little boy you could ever meet. He is so handsome that people stop in their tracks to see him. We are blessed to have him in our lives and so lucky he is only a 5ish hour drive away.
While I was recovering from surgery, I ended up joining an online Health & Beauty company that blew up in popularity. I instantly had a huge group of people join my team, was making a bunch of money, and the products were flying off the shelf. This business was starting to take over my life. Ever waking second was spent trying to ensure my team was learning, I was hitting my sales targets, and that customers were satisfied with their product. This was fine for the first couple of months, because I wasn't working my regular job. Once I went back to work, I was struggling more and more to keep up. The leadership of the team I was on was changing processes and ways of doing things on almost a daily basis. To be honest I just couldn't keep up. This same leadership was also asking more and more of the "leaders" and some of the asks were against my beliefs and business acumen. I eventually fell out of love with the leadership, starting hating ever second of being involved with the company, but still loved the products. I made a decision that I no longer wanted to be associated with the leadership team I was associated with and that I would stop selling for this company. The moment I made this decision a huge weight was lifted, that I feel was holding me down. Yes I gave up a legitimate source of additional income, and a team that had massive potential, but to me, it just wasn't worth it. People think I am crazy for giving that up (including a trip to South Africa), but I have zero regrets.
The summer of 2017 started off great. I headed to our annual Silver Icing conference in Vancouver at the beautiful River Rock Casino. It was a BLAST as always. Who wouldn't love to hang out with 100 of your "online BFF's" for the weekend, improving your business skills and having way too much fun. These weekends are so refreshing and soul fulfilling. This one did not disappoint.
These conferences usually start on Friday and end on Saturday night. During the Friday session, I had checked my Facebook page. I am starting to see some posts that a wildfire had started and burned through a community that is only 30 minutes and about 20k from my house. Within a short amount of time, it devastated two communities. By the grace of God, and the hard work of Firefighters, the fire did not burn the whole town of Ashcroft and Cache Creek down. The fire was spreading fast, and new ones had started in numerous areas north. One of my fellow stylists is from Williams Lake area and her neighbourhood is on evacuation alert. One of the other stylist got a call from her husband who was at a family cabin in the area, and he was under alert. I had no idea what I would see when I got home from the conference.
Upon driving from Vancouver to Kamloops, I saw a few smoky areas but nothing too bad. As I got closer to my neighbourhood, I could start to see the smoke. When I got to the police checkstop which was just down the road from my house, they asked me where I was going. I explained I lived in the neighbourhood just down the highway and we were not under evacuation. They let me through with no issues. As I got home, the smoke in the air and the dryness of the air caught me off guard. When I left a couple of days earlier, there was still green leaves on my one scraggly tree. Now they were crispy and brown. The bunch grass was also crispy and looked like hay. There was smoke plumes that I could see in the distance.
My husband had come home early from work and was asleep when I got home. He had worked a night shift the night before so he was exhausted. I honestly turned it into panic mode. I ran around the house like a mad person gathering everything that I thought we would need to take if we got evacuated. I grabbed house docs, jewelry, pictures, and anything sentimental. I piled it all in front of our main door. When my husband got up we figured out a plan of attack. We had to figure out a place to store his old vehicle which we had just took to our property a couple of weeks before. We also had to pack up our cargo trailer and put it somewhere. Luckily two of our friends in Kamloops had room for us to store them for a bit of time. We also prepped our property by cutting down weeds around our house and shop. We moved anything that could easily catch on fire away from the structures. My vehicle was packed with the most important stuff including a go-bag. We decided we would put the dog in doggy daycare while I was at work so that we could get to her quickly if there was an evacuation.
A week or so went by and it seemed like the fire wasn't coming much closer to our place. Upon coming home from work one Friday there was a very weird looking plume of smoke coming from the West, and it looked like an area north of Cache Creek was on fire. My neighbour had come over and we watched the fire for awhile. The smoke cloud was getting bigger and bigger. My neighbour left to pack up some stuff, and I got some stuff ready just in case. I went to bed that night a bit worried. I sleep with ear plugs in, which I really need to give up.
At 6am the next morning, my neighbour was banging on my bedroom door. Apparently the night before the cops had banged on my door, but I didn't hear them. They had just came to her house to tell her we were on evacuation notification. They had said there was no answer at my door but she knew I was home. About 30 minutes later a copy came back down the back road and stopped at my back gate. I could see him coming so I went out to the gate to chat with him. He told me that we were on notification as a precaution. That was enough for me, I decided to head out to my relatives in Vernon to spend a couple of days. I grabbed my work computer on the way through Kamloops so I could work from home.
This cycle went on for the entire summer...on notification, head to Vernon, come back a couple days later. At one point my neighbours across the highway (1500ft away from us) were actually evacuated, while we were still on notification. That two lane highway road is really going to stop that fire from crossing!
By mid August, the fire was still wreaking havoc. It had been on again off again creeping towards our area. Most days were pretty smoky. One day I was at my friends in Kamloops for a get together. I had put the dog in doggy daycare for the evening and picked her up before heading home. I was getting updates from twitter that night that they were loosing the battle in an area quite north of our place. It was a very clear night, so I could see a bit of an orange glow on the way home above the wooded area that they were fighting that night. To my surprise when I got home, it was actually clear. That was the first clear night in weeks and weeks. As I drove into my neighbourhood and down the driveway, I could see spots of flames in the hill about 10km away. This was the first time I could actually see the flames and it was terrifying. I watched from my deck for about an hour and could see numerous areas that had small orange areas, and I could see the odd tree candling on the hillside.
The fire situation went on until the end of August. For a couple of weeks we had the Firefighter Camp just down the road. I may have had to stop in the store next door for cool summer treats more than usual for those two weeks! One day we had a pretty good rainfall which really helped the situation. I was never so happy to see rain. I may have shed a few tears!
Thankfully we had an uneventful Fall season, and a decent start to winter! Our furnace was causing issues around Christmas, and is thankfully pumping heat right now! We ended the Christmas season with a lovely get together with neighbours at our house. It was a good old fashion blizzard, but we still had a house full of neighbours, an amazing seafood chowder (recipe to come in the next post) and lovely conversation!
I will be starting to blog more this year. I find it a good way to relax, I just need to find more time to actually write.
I hope you all had an amazing 2017. I know that 2018 will be amazing!


