Saturday, February 24, 2018

A Turtle Crossing the Highway in the Desert


My daily commute to work is a wild one some days.  It sometimes makes me think of the song "Over the river and through the woods" but it's more like "Over the mountain and around the lake, did I really see that, or was it a mistake?"  There is never a dull moment on this commute, and I have seen some things that I never imagined I would see on a drive to work.

The ride is a 45 minute drive on the Trans Canada (Hwy 1) from my little town to the sprawling metropolis of Kamloops.  It starts off with right-hand turn onto a dead straight stretch which is great for acceleration but quickly turns into the windy Deadman Creek area, or "Deadman's" as the locals say.  This is the first of four "sketchy" areas of the drive.  We have seen many vehicle incidents in this area, most notably a transport truck with a massive industrial unit, who clearly misjudged the turn and ended up on the opposite side of the road, tipped over onto its side.  It took a couple of massive cranes and a couple of days of work to get it out of there.  That was surely a million dollar oops.

After getting down "Deadmans" the road straightens and has an immediate passing lane, which is long enough to blow past the slow semi's who are gradually regaining speed after creeping down the hill.  This route often has semi's along the way, but in the Winter months, you are bound to see a tenfold increase.  See this route is the alternate route to the Coquihalla Highway, or as some of you may know it, the "Highway thought Hell" as it is aptly named from the show bearing the same name.  The "Coq" is closed it seems more often than it is open in the winter.  When it is closed, my daily commute has all of the "Coq" traffic.

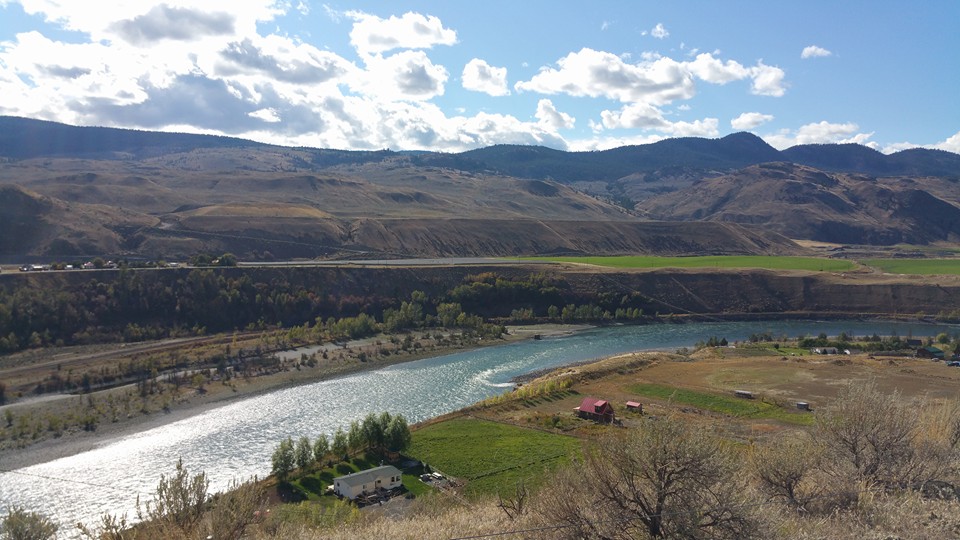
The drive quickly goes through the town of Savona, a beautiful little town along Kamloops Lake.  The rest of the drive winds around the lake, which provides daily spectacular sunrises and sunsets.  
After Savona is the worst part of the ride, heading up "Size Mile Hill" which is I am assuming 6 miles long.  This "hill" is what I consider "the mountain" as I am sure it qualifies as a mountain pass.  It is extremely windy, very tight in some areas, has passing lanes in some areas, and still makes me squeamish some days.  This part of the drive requires laser focus.  One moment of distraction could see you down an embankment or in a head-on collision. We have seen quite a few bad accidents in this area over the last couple of years.  I still drive well under the speed limit during the winter months on this stretch because I'd rather be alive on the other side of the mountain.

One of the funniest things I have seen on my commute was on "the mountain." One day I was driving along, almost to the mountaintop, and I see what looks like a weird looking flat, round rock on the opposite side of the road.  As I come up closer, it looked like it had moved closer to the yellow line.  Dumbfounded, I tried to look a bit closer as I drove past as I knew I wouldn't be able to turn around and go back.  All I could think was "Is that a turtle?  We're like 800 ft up from the lake, and this is the desert...why on God's dusty dry earth is there a turtle in the middle of the desert?"  All the way to work I was doubting myself.  There couldn't have been a turtle crossing the highway in the desert.  I was telling one of the new co-workers about the incident.  She lived in the Kamloops area for years and confirmed that there are actually turtles in the wild.  I sure didn't think I would ever witness that on my commute to work.


The top of "Six Mile" is a beautiful rest stop that is a great place to stop and snap a picture of beautiful sunsets and sunrises.  It's also an area you need to watch out for Rattle Snakes.  Yes, you head that right, Rattle Snakes.  This area is pretty rocky and hot, which these snakes love.  There are signs there warning that there have been Rattlers spotted in this area, so heed the warning.


The downward slope of "the mountain" has spectacular views of Kamloops Lake, and is home to Tobiano, which is a luxury golf course/housing community.  It is supposedly one of the best golf courses in BC. It also has a marina, which is popular with boaters in the area.

You then come into the Cherry Creek area, which is a similar type community to mine, an acreage/hobby farm community.  This stretch of road is known for deer getting hit on the road.  I have had to call in more than my fair share of calls to the cops to assist animals on the road that were hit but still alive.  There is a couple of times a year, which the morning commute happens at the same time as the "deer witching hour" as I like to call it.  It's when the drive starts in the dark at my house and is just getting bright by the time you are coasting down "the mountain."  It only lasts about a week, but it's not uncommon to see 4 or 5 deer being hit on the highway.  I have the local RCMP number in my phone so I can make a quick hands free call if needed.

The drive through Cherry Creek is actually a good 1/4 of the drive.  There is a beautiful horse boarding facility, and we often admire the horses and their shenanigans.  One morning I was driving through, as I was coming into Cherry Creek I sadly saw an adult and baby raccoon who had been hit on the road, which actually got to me and made me sad.  A few minutes later I was driving past the horse facility and one of the horses was standing next to the fence, resting his head on one of the fence posts.  This immediately made me bust out laughing and think of this meme.


One morning, just a little further down from the horse facility, there was a tour bus that had crashed overnight.  Turns out it was Jason Aldene's tour bus, which had an accident after their concert in Kamloops.  Luckily noone was hurt in this accident.


One day in the spring of 2017, I was driving through Cherry Creek and was shock at what I saw.  The day before we had noticed some flooding in some of the farmers fields in the area.  We hadn't thought much about it.  This one day, as I was driving towards one of the local roads in the area, I noticed that the water from the creek was overflowing its banks.  Turned out to be one of the worst flooding situations in a nightmarish spring.  Roads washed out, bridges washed out, and it was a true disaster for the people in this area.  Cache Creek, the town to the west of our house, also had massive flooding and sadly lost their beloved Fire Cheif in rushing flood waters.  Mother nature sure was not happy in 2017.


Just a bit further down the road, one morning I came upon a broken down donut truck who looked like he was on his way to a carnival or food festival.  I pondered whether the driver could whip me up a batch of donuts in exchange for a ride to town.  Although I love Donuts, I have also been schooled in "stranger danger" and decided not to stop, he looked like he was on the phone calling for assistance.  Now I want Donuts.


After winding through the last curvy area in Cherry Creek, it is smooth sailing into Kamloops.  As much as the commute along Highway 1 sounds terrifying, the sketchiest part of the ride in the winter is usually in Kamloops.  Once you make the turn onto Highway 5, which is actually the end of the 120km/hr Coqihalla, it's a bit of a "dodge the slowing down trucks" game.  Luckily the merge onto the highway is it's own lane, so most days the trucks are just blowing by you on the one side and not coming up behind you in the same lane.  

For a city that is in the middle of many mountainous areas, and has been getting "good old Canadian Winters" I am sure since before snow clearing equipment has been around, Kamloops has some seriously awful winter driving conditions.  Everyone always asks about my commute during winter conditions. Most of the time the highway is relatively clear, but once I get into Kamloops, it's like "ice road truckers" on actual roads.  The roads are so slippery.  I almost slid through a turning lane right into a car at the top of the lane one morning.  I could see the ice from about 150 feet away, but there was no avoiding it.  You could see about 10 other vehicles tracks who weren't so lucky and had to steer their cars into the side of the road into the snow banks.  

One of the biggest complaints I have about the commute is that BC seems to put gravel mixed with sand on the roads for traction, well not quite as big as regular gravel, but damn those rocks can cause some damage to windshields. Thank goodness most insurance policies here cover windshields.  I have to replace mine probably twice a year.  With a 60km each way ride to work and back home, I get hit by a flying piece of gravel probably once a week.  My windshield has more cracks than a plumber convention (sorry if that offended any plumbers).


I am sure the next many many years of making this commute will have many more interesting things to see.  Truth be told, the commute does get easier as time goes by.  It is a good wind down after a hard day at work because you have to shut your brain off and concentrate on the road.  Thinking about work on the road will get you into a situation that you may not want.

I hope you enjoyed these stories.  Thanks for reading.

Jen


Tuesday, February 6, 2018

That time I moved from the North Pole to the Desert


For the last two and a half years, I have been writing this post in my head.  The whirlwind of this time passing has spun me "right round" about 10,000 times.  I decided that it was time to sit down and put it on paper...well metaphorical paper.

It all started in May of 2003 when I jumped on an airplane the day after I graduated from university.  I was headed off to the "North Pole" aka Fort McMurray, Alberta.  I call it the "North Pole" because to be frank...it's freaking cold for 1/2 the year.  The 12 years I spent in Fort McMurray was also a whirlwind.  I secured a great career and worked with some amazing companies.  I met my husband, got married and bought our first house.  We got a dog, made a lot of friends and had a lot of fun.  

Having grown up in British Columbia my husband always dreamed of moving back to the province.  Being from the East Coast, I had never even once thought about living in British Columbia.  My friend who had moved from Fort McMurray to Kamloops BC had given me a line on a job with an amazing company in her town.  I applied for the job and hadn't heard anything for months.  Fast forward to October of 2014, my hubby really injured his back, and we weren't sure what the future held.  The day after he was taken by ambulance to the hospital for a 9-day stay, I got a call from said company, asking me to interview for the job.  I ended up turning the job down because I just wasn't sure what the future held...and it just wasn't the right time.

About 6 months later, the job was coming around the second time.  My husband was feeling much better and encouraged me to apply for the job again.  We had one dilemma though, we needed to find somewhere to live. We searched and searched for the perfect property.  We had initially been looking at older properties which needed a bunch of work.  We miraculously came across a property listing that had everything we were looking for, rancher house with a big kitchen, huge shop and a decent chunk of land.  The only thing that could make this property better would be if it was closer to town.  A 45-minute commute to work would be a challenge, but doable.  We put an offer in on the house on the spot.  I got the job a couple of days later.  In two short months, we would be moving to sunny Savona, BC.

I was scared to death of what was to come.  I was scared of being alone while my husband worked.  I was scared of the drive to work.  What if there was a huge snowfall, what if there was a wildfire while I was at work.  What would I do with the pupper if I was going somewhere?  What would I do if something in the house broke?  What would I do if someone broke into the house in the middle of the night?  The list of fears was endless.  

The last Friday in July, I packed up my office, packed up my Suburban, and the next morning I officially headed out of Fort McMurray.  I thought I would be more emotional when I left.  I said my goodbyes to family and friends during the week, but I can honestly say I didn't shed one tear leaving my house and the place I called home for the last 12 years.

It took me 2 days to get to Savona, with a stop into Calgary on the way down to see my Sister and Brother-in-Law and to break up the drive.  The drive from Calgary to Kamloops is a beauty that time of year.  It was also tire melting hot.  I knew I was getting closer to "home" when I rolled through Kamloops.  I had only been to the property once before with our realtor.  In the 15 minutes we were there I managed to step in a massive cactus patch and had a huge cactus quill shove itself right through my squishy sneaker sole, right into the pad of my foot.  You may be thinking, why would there be cactus in your new yard? Well, the answer to that question is because our new house is in the middle of Canada's desert.  


My new job started the day after I arrived in the new desert home.  The drive to work was a bit intimidating at first, going up and down a windy mountain every day.  Luckily that mountain is part of Highway 1, and it's a bus route so it is kept quite clean.  The first couple of days in my new house I met more neighbours than I had the entire 12 years in Fort McMurray. See, our house is at the back of our property, perched on a gorgeous bench that kind of overlooks a river.  There is another bench about 300 feet below us, which is closer to the river.  There is a "road" aka "dirt path" behind our house that people walk and ride on all the time.  Multiple times a day horses, people, dogs, and other assortments of animals make their way past the back of our house.  We have a beautiful covered deck that is parallel to that train, so I spent a lot of time getting acquainted with the views from the back of the house.  Conveniently it's very close to the trail so I also got to know the neighbours quite quickly.


The first weekend at the house, about 8 women showed up with wine, to welcome me to the neighbourhood.  I had met some of them already, but most were new.  They told me all about the community, including all of the creepy crawlers I had to be wary of.  There were snakes, including rattlers, black widow spiders, coyotes, mice and many other critters.  After the gang of women departed, I started making a list of things I needed to pick up to defend our property.


I headed into Kamloops Canadian Tire the next day armed with a list of things I needed.  I had never been to this Canadian Tire before so I had no idea where to look for the things I needed.  An older gentleman who worked there asked if he could help me.  I handed him a note that said...


The worker may have looked at me like I was an axe murderer that just escaped from the jail up the road.  To make myself feel better, and to prove I wasn't some sort of shovel-wielding killer, I quickly explained that I just moved into a new house in the boonies and I need these things to ward off the critters and pests.  He helped me find the four items and I made my way back to the desert.

About two weeks after moving into the house, my husband was home for the weekend.  We decided that we had to do something about the 6 foot tall weeds in the front yard.  My husband showed me how to turn on and run the John Deer lawn tractor that came with the house.  To be honest, it may have taken him a few times to show me before it stuck in my head.  As I was mowing the "lawn" which is really just weeds and cactus, the wind was picking up quite a bit.  As I was about 3/4 of the way finished mowing through the 6 foot weeds, I wasn't going to stop for a little wind.  Turns out it was actually a lot of wind, and it was kicking up "tumbleweeds" and blowing them around the yard.  One of them hit me square in the side of the face as I was rushing to finish up mowing.  I ran for cover onto our covered deck.  


Much to my disgust, I noticed a small snake slithering between the deck and the siding.  I panicked because I knew if my Husband saw it he would die...or at least faint.  I grabbed the Canadian Tire shovel that I just purchased, and I "relocated" the snake.  I can't say how or where, but let's just say it wasn't in our yard anymore.  I went up to the shop and told my husband and he almost passed out. 

That night when we were just getting ready to go to bed, my husband spots a mouse in the house.  Great, just great.  Another critter that needed to be dealt with. Luckily there were some traps which the previous owners had left.  The next morning the mouse was no longer.

Who knew that the first couple of weeks in our new home would be so eventful.  I never thought I would learn to drive a tractor, deal with a snake, get hit in the face by a tumbleweed and kill a mouse in a 24 hour span.  

Here is to many more adventures in this crazy countryfried life.

Jen


Monday, February 5, 2018

Caramel Chocolate No-Bake Cheesecake


Over the Christmas season, I saved all of the bits and pieces of a couple of batches of shortbread cookie dough and froze them to use in the future.  I also some cream cheese that needed to be used up.  One snowy weekend I decided that I would make a cheesecake.

Out of all of the kitchen tools and gadgets we have, I couldn't for the life of me find a cheesecake spring form pan.  I knew I had one at one point in my life but coupe not locate it when I needed it.  In hindsight, I should have made this cheesecake in a square baking pan.

This recipe is one you may want to make when you are in the kitchen doing other stuff as it has quite a bit of waiting around time.

Shortbread Base
1 cup Butter
1 cup Flour
1/2 cup Icing Sugar
1/2 cup Corn Starch
1 tsp Vanilla

Caramel Layer
1 can Eagle Brand Sweetened Condensed Milk
1 tbsp Butter

Cheesecake Layer
2 block Cream Cheese (8oz)
1 cup Powdered Sugar
1/2 cup Whipping Cream
1 tsp Vanilla

Chocolate Ganache
1 bag Semi-Sweet Chocolate Chips
1 cup Whipping Cream


Shortbread Base:
  • Pre-heat oven to 325 degrees. 
  • Mix all ingredients in mixer until soft dough forms.
  • Spray springform pan with no-stick spray.
  • Add 1/2 the shortbread base and pressure into the bottom of the pan forming an even layer.
  • Freeze the remaining dough or make some cookies.
  • Bake crust at 325 for 25 minutes until slightly brown.


Caramel Layer
  • Heat butter and sweetened condensed milk in a pan over medium heat until it turns a slightly brown color.
  • Pour over the precooked shortbread base.
  • Refrigerate for 1 hour.


Cheesecake Layer
  • Mix room temperature cream cheese, whipping cream, powdered sugar in a mixer until smooth.
  • Add vanilla.
  • Pour over cooled caramel base.
  • Smooth out top with a spatula.


Chocolate Ganache & Finishing
  • Warm whipping cream for three one minute intervals in microwave (or over low heat on the stove)
  • Pour chocolate chips into the hot cream.
  • Stir until chocolate chips are melted into the cream.
  • The mixture should look like warm runny chocolate icing.  
  • Let cool for about 10 minutes.
  • Stir again.
  • The mixture should be a silky smooth pourable icing.
  • Pour over cheesecake layer.
  • Top should be smooth like a skating rink.
  • Refrigerate for 4 hours.


This dessert is pretty sweet which is why I think it would be better as a square.  A little goes a long way.


This would be a great addition to a hot cup of coffee.


Jen

Sunday, January 28, 2018

Instant Pot Egg Souffle

I love eggs, and I love Starbucks.  Over the weekend I was checking out recipes and I stumbled across a couple of recipes for "Starbucks Sous Vide Eggs" which I had never heard of before.  I have been trying to make my own coffee every morning to avoid paying for coffee.  So far it has worked, I have only been to Starbucks maybe 2 times in December.  Yah for my pocketbook! Boo for my knowledge of new Starbucks menu items.

When you head over to the Starbucks website, the first thing on their site is about their "Sous Vide Eggs" which essentially are like an egg souffle made in a Sous Vide machine.  Sous Vide is a method of cooking the food in a water bath. Food is in a vacuum sealed bag.  It's fancy schmancy and you need a special machine.  I decided to give these a try in my instant pot as many of the recipes had recommended.

Ingredients:
4 Eggs
1 Cup Cheese (I used cheddar/mozza mix)
1/2 Cup Cottage Cheese
1/3 Cup Heavy Cream
1 tsp Salt
1 tsp Pepper
Other Spices (I only used S&P for this round)
4 Slices Pre-Cooked Bacon
Cooking Spray


I thought I would have enough small mason jars to use but I didn't.  The mason jars that didn't have food in them were the 500ml size which has a fluted top which would not allow for the eggs to come out easily.  I found a large silicone muffin tin which I don't really ever use.  I decided that I would cut this pan up to fit into the instant pot.


Mixing the Souffle - Add all ingredients except the bacon into a blender. Mix on high for 25 seconds.  Volume should double.  


Preparing the Instant Pot - Add 1 cup of water to the bottom of the instant pot.  Add in the wire baking rack that comes with the unit.  

Preparing the Muffin Tin - Spray each muffin cup with non-stick spray.  Add a 1/4 of the bacon to each cup.  Set the muffin tin inside of the instant pot on top of the wire rack.  Gently pour the egg mixture into the muffin cups.  This is a bit tricky to do while the tin is inside of the unit, but because of the flexibility of the silicone, it was impossible to pour it in the cups and then getting it into the unit.


Setting the Instant Pot - After checking all of the seals and gauges, put the lid on and turn the pressure gauge to closed.  Use the steam function and set for 7 minutes.  When it is done, let it come down in pressure naturally for 8 minutes.  Mine came down naturally in 6 minutes so I just left it in the pot for another 2 minutes.


Removing the Egg Souflees - I had to use tongs to grab the silicone muffin tin and pulled it out of the pot.  The eggs looked like little eggy muffins.  They were kind of silky like on the top.  I gently removed an egg from the tin.  It was soft but held it's shape.  

I decided to throw a little bit of Dave's Hot Sauce on the plate with my egg souffle.  The souffle was quite tasty.  It was like a really soft omelette.  It was a bit silky, and soft and had a mild cheese flavor.  The bacon was a nice addition.  


Overall I would give this recipe a 4 star.  It was pretty labor intensive for the four little souffle but it is delicious.  Would I pay $5 for one of these at Starbucks?  Probably not.  These would be a good option for a fast food low carb or Keto diet option though.

As always, thanks for reading.

Jen


Saturday, January 27, 2018

Get in My Belly (aka Pork Belly Sandwich)

A couple of months ago I was coming back from Vernon after a visit with my relatives.  I was starving by the time I got to Kamloops, so on the way through town, I stopped into Arby's.  I'm not the biggest fan of Arby's but it was on the way and quick and something different.  When I pulled up to the drive-thru they had a sign for a limited time special, the Pork Belly sandwich.  I had pork belly before at a Korean BBQ place and I was thoroughly underwhelmed.  It was like thinly sliced pork tenderloin.  It was a far cry from what pork belly looked like on the food network.  I always thought pork belly was almost like a thick bacon cooked until it was tender and then sliced.  The picture of the Pork Belly sandwich looked like the pork belly I had longed to try.  I decided to try one.  It was the most delicious fast food sandwich I had ever tried.  

The sandwich had chunks of Pork Belly in a tangy BBQ sauce, with a battered onion frizzles on the top, a smoked cheddar cheese, and a bit of mayo on the bottom. The pork belly was like giant soft bacon, without the saltiness of bacon.  The whole sandwich was a perfect consistency.  It was so soft, and the onions gave it a little bit of crunch. The BBQ sauce was tangy yet sweet, and the mayo gave it a bit of creaminess.  I am pretty sure I ate this thing in maybe 4 bites.  My mouth watered the entire 1 hour drive to my house.  

ThHappy Man Snacks review of the Arby's Pork Belly Sandwich was literally exactly what my reaction was to this sandwich.  Check out their youtube channel here: Happy Man Snack Review


Love this review of the Sandwich from Whitfield's Food Revue as well!  Check out their youtube channel at: Whitfield's Food Revue


Sadly, a month or so later I went to get another one and it was gone.  It was only available for a limited time and to my disappointment I missed the boat on getting another one.  Since I had driven to Arby's for lunch, I figured I would just get something else.  I decided to get a buffalo chicken sandwich. It was terrible!  I was probably pre-judging the buffalo chicken because it was not what I was expecting.  It was sloppy, way too spicy for me, had far too much sauce on it.  I ate it only because I paid for it and needed to eat something before heading back to work.

I was at a local butcher last week picking up something and asked if they ever got pork belly.  They were able to pre-order me some, which came in this week.  I picked it up after work yesterday, along with some buns.  I was determined that I was going to make a Pork Belly sandwich of my own.

I ran into a couple of issues right away. First being, I have no idea how to cook Pork Belly.  I researched most of Friday night on methods of cooking.  Some recommended slow cooking, fast cooking, two-part cooking where you cook then cool in the fridge then cook again.  Since I just got an instant pot last week, I was really looking for a way to cook it in the new gadget.  The second issue, I really had no idea how to score the skin of the belly.  After looking at what seemed like a thousand recipes, I settled on one for one that used the instant pot.  I modified the recipe, as always, because I didn't have all of the needed ingredients. This is an all day kind of recipe and you will most likely use a million dishes but it's totally worth it.

Jen's Pork Belly Sandwich Recipe

Ingredients

2 lb of Pork Belly - Skin On
8 Soft Buns
8 Slices Cheese

Marinade:
4 Tbsp Lemon Juice
3 Tsp Epicure Oh Canada Dry Glaze (or 1/2 tsp each Garlic, Salt, Black Pepper, Paprika, Onion Powder plus 1 tbsp maple syrup)

Stock:
2.5 Cups Water
1/2 Cup Soy Sauce
1/2 Cup Red Wine
1 Bay Leaf
1/4 tsp Thyme
2 tsp Epicure Satay Seasoning (or 2 tsp Chinese 5 spice)
1/2 Cup Honey

Frizzles:
2 Med Thinly Sliced Onions
2 Cups Buttermilk (or 2 Cups Milk with 1 TBSP Lemon Juice)
1 Cup Flour
Salt & Pepper
Oil for Frying

Preparing the Pork Belly - Get the pork belly out of the fridge and cut it into smaller chunks because it was massive.  I cut a chunk about 12 inches by 6 inches.  The next step was to score the skin on top of the slab of porky goodness.  I grabbed my sharpest knife and scored through the skin in a crisscross manner.  This was actually pretty hard to get through even though I sharpened my knife prior to trying.  I cut down about 2mm into the skin.

Marinating the Pork Belly - Add all ingredients for the marinade into a ziplock bag with the scored Pork Belly.  Get as much air as you can out of the bag.  Stick in the refrigerator for an hour.

Preparing the Stock - Pour all ingredients for stock into a microwavable bowl and heat for 3 minutes on high.  Let sit until you are ready to add to pot.

Searing the Pork Belly - Turn on the Sear function on the instant pot, which essentially is like a really quick heating frying pan.  Sear both sides of the belly for 3 minutes.  I would highly recommend throwing a pot lid over the instant pot while you are searing the skin side as it pops and sprays and makes a big mess.  Luckily my biggest lid in my pot set fits perfectly on top of the instant pot inner "pot."  That is a lot of the word pot in one sentence!  I may have left the skin side of my belly in a bit too long, the honey carmelized to the bottom of the pan and created a bit of char.  

Cooking the Pork Belly - Once seared, pull the piece of meat out of the instant pot, stick the cooking rack in, sit the belly on the cooking rack with the skin side up.  Pour the stock into the pot, avoiding getting any on the top of the belly.  It would probably be easier to just pour the liquid in first then put the belly on the rack.  Check all seals and gauges on the instant pot lid, then close the lid and turn the pressure gauge to closed.  Set the unit for stew/soup for 18 minutes.  Because the unit was hot from the searing and the stock was warm, pressure built in my unit in less than 5 minutes.  Once the 18 minutes is up, manually de-pressurize the unit by using tongs to turn the pressure gauge to release.  It only took about 2 minutes to come down in pressure.  


Cooking and Pressing - The next step is to cool and press the pork belly with something heavy for a couple of hours.  I used two glass pans with parchment paper under and on top of the belly, and then put a couple of heavy cans of tomatoes to weight it down.  I really need to get a kitchen weigh.  I have been talking about it for years, like every time I make grilled cheese.  Apparently, they are called "Gill Press" according to Amazon.  I may have to purchase this super cute Norpro one that has a piggy on the top, and has great reviews. I stuck it in the fridge and waited about 2 hours for it to cool down.


Prepping the Onions for Frizzles - Slice the onions as thin as humanly possible. I used my mandolin.  Add onions and buttermilk to a bowl and let sit in the fridge for an hour.

Slicing the Cooled Pork Belly - Dig the pork belly out of the weighted contraption and slice it with a sharp knife, with the grain.  Slices should be about 1/4 of an inch thick. It should look like thick slices of pork with layers of fat in between.


Saucing the Pork Belly - Use your favorite BBQ sauce to coat the pork belly slices and fry in a pan on low until the pork is hot.


Coating and Frying the Frizzles - Mix the flour and salt & pepper in a bowl.  Take the onions out of the milk bath and put a handful at a time into the flour coating.  Using a deep fryer or in a pan, fry the frizzles until golden brown. 


Assembling the Sandwich - Split buns in half and toast the cut side so it is a bit crunchy.  Add may to the bottom half.  Add a slice of cheese to the top half.  Add 2 slices of pork belly to the bottom half, then cover in frizzles.  Stick the top bun with the cheese in the microwave for about 25 seconds to melt the cheese a bit. Add the top half to the bottom.


What to pair with this sandwich?  This sandwich is rich and needs to be accompanied by something like a side salad.  Coleslaw or broccoli salad would also be good choices.  


You will most definitely need some napkins when eating this beauty!  


Oh my god, this sandwich may be better than the Arby's version!  My pork belly wasn't quite as soft as theirs but I will perfect it.  This sandwich is like BBQ angels put heaven into a bun.  This may be the best thing I have made in a long long time.  My mouth is still watering after finishing it off about 20 minutes ago.


Pork Belly may be my new favorite cut of meat!

I hope you enjoyed and you try this out if you have a whole day to kill.

Jen


Sunday, January 21, 2018

Broke Down and Bought a Power Pressure Cooker XL (same as Instant Pot)

I heard about the infamous "Instapot" about 6 months ago and to be honest, sort of brushed it off as the next "fad" kitchen gadget.  I was determined I wasn't going to get one because lord know's I do not need another kitchen appliance.  I have two slow cookers and a pressure canner which converts to a pressure cooker.  I also have a yogurt maker which I must admit kind of is terrible, it's about 50 years old and the jar lids have all broken. 

Over the Christmas season, I am pretty sure 25% of my friends received an "Instapot" for a present. My mom even bought one.  Seeing people I know in real life talk about the quick meals they have been making peaked my interest.  After much research, I decided that I needed the Instapot that had the largest size and the most functions (of course I did...).  My problem was that it was $220 plus tax, which would throw it into the $250 range with the wonderful 12% tax rate in beautiful British Columbia (aka Bring Cash). 

I looked at some of the other brands that were out there.  One that peaked my interest was one called the GeekChef. I was initially drawn to this one because it had a Canning function and a Sous Vide function.  I do a lot of canning in the summer months and a pressure canner is a necessity for canning anything outside of jams, acidic fruits, and tomato based stuff. Anything that is lower in acid needs to be pressure canned to kill the spores which could cause botulism.  I invested in a Presto 23 quart Pressure Canner last year.  It's easy to use once you get used to the concept, but it takes FOREVER to come up to pressure.  I have tried cooking in it as it converts to a pressure cooker. The meal I made in the pressure canner turned out good, but it took awhile to come up to pressure, and then back down in pressure. It isn't recommended to speed the de-pressurization of a canner/cooker.  The pressure up and down adds at minimum an hour to the process.  The Sous Vide function also peaked my interest because well, I never heard of it before, and it looked cool.  It's basically cooking the food placed in a sealed plastic pouch until it hits a perfect temperature.  It looks amazing, but the reviews on the Sous Vide function of this one weren't the greatest.  They are also pricier than some of the other options.  I decided if I could find one in Kamloops at a decent price I would consider this brand.  I had zero luck finding one of these GeekChefs in Kamloops. 

We were heading into town to do some shopping on Saturday.  I decided I would look around at the stores we were in to see if they had any options available.  I was in Costco, our last stop, and I walked by the small appliance aisle.  I noticed a box that looked like an "Instapot" so I headed down that aisle.  To my chagrin, it was an Electric Pressure Cooker!  It was one of the brands that I had looked at on Amazon.  It was called a Power Pressure Cooker XL.  It was an 8 Quart, which was bigger than most, it had a canning feature, had a bunch of pre-set functions, and the best part, it was only $119.  This is very similar to the Instapot version I was looking at that was $220.  The only thing it is missing is a yogurt function and some of the pre-sets.  I am sure you can still make yogurt in it, just no pre-set button.  It felt like Christmas!  You can also get this version on Amazon but it is about $50 more expensive.


Last night I read through the manuals on the operation. It sounded kind of tricky to operate but once I took it out of the box this morning and actually did the testing that was required before first use, it actually wasn't that hard at all.  Basically, you need to make sure all of the pressure sensors and seals are clean and working properly.  You add your ingredients, close the lid, turn the pressure gauge to closed, and press the buttons for your recipe. It took about 15 minutes to come to pressure, which seemed long, but I had cold water in the pot.  Once the pressure was up to where it needed to be, the pot made some hissing noises and the red pressure button popped up.  This scared the life out of me, but the same thing happens with my pressure canner, so I assumed that this was a normal feature.  Once pressure is reached, the timer starts counting down, which was 10 minutes.  Once the 10 minutes were over, the machine beeped.  

The next step in the test phase was to de-pressurize the unit.  With the pressure canner, you always let it naturally come down in pressure, which takes forever.  The instructions for the Power Pressure Cooker de-pressurization was to get a pair of tongs and manually open the pressure valve.  I thought that would be super easy, but it was definitely not as easy as it sounded, and it took me a couple of tries.  This is not something you would want to do without some tongs and definitely not with your bare hands.  When you move the pressure gauge to open, it spurts and starts letting out a gush of steam.  My husband came out of the bedroom to see what all of the commotion was about.  It dropped in pressure enough to lower the red safety button in about 3 minutes.  That was super fast considering it takes about 30 minutes for my pressure canner to come down in pressure.  Testing was a success.

I decided later in the day to try cooking my arch nemesis, hard-boiled eggs.  I can cook and bake some pretty impressive stuff, but hard boiled eggs are not one of them. I love to eat them, hate the whole process of cooking them and peeling them.  I always end up getting shell everywhere, cracking off half the egg in the process.  The last time I made them they looked like mangled white rocks.  My mother had done some eggs in her unit as a test, so I thought I would give it a try.  The recipe said to use the rice cooking feature of the unit and to add about 1.5 cups of water.  I placed 8 eggs on the little tray thingy that came with the unit, added the water (hot this time to see if it would help speed the pressurization), closed the lid, turned the pressure gauge to lock, and pressed the rice button.  It took about 10 minutes this time to come to pressure, and then 6 minutes to cook.  The recipe I had said to let the unit come down in pressure naturally, which took about 5 minutes.  It then said to put the eggs in an ice bath once out of the cooker.


After about 5 minutes in the ice bath, I decided to take them out and start the process that I despise, cracking and peeling the eggs.  I took one of the eggs and tapped it on the counter to crack the shell a bit.  I got under the membrane and the shell peeled off pretty easily.  Even the one egg that had a crack in it when it came out of the cooker peeled very well with no damage.  


I rinsed the eggs off, because I hate tiny bits of eggshell, and then sliced one open.  The inside of the egg was a little discolored which leaves me thinking that they were overcooked.  The next time I make these I would either lessen the cooking time by a couple of minutes and still let them de-pressurize naturally, or I would leave the cooking time at 6 minutes and then de-pressurize manually so they aren't sitting in a hot water bath for longer than needed.


I added the eggs to a container and poured a salt brine over them (water with 1 tsp of salt).  This will keep them fresher longer.  Overall the egg experience in the cooker was much more successful than my normal egg cooking experiences.  A couple of changes the next time and I think that these will be perfect.


Thanks for reading! 

Jen